Gathering Your Bracelet Making Supplies
How to tie off elastic bracelet – Before jumping into the creation of your elastic bracelet, make sure to have all necessary supplies on hand. A well-prepared workspace leads to a smoother crafting experience. Here’s what you’ll need:
- Stretch Cord: The backbone of your bracelet. The blog recommends Stretch Magic, a known and trusted brand in the field of stretchy jewelry creations.
- Beads: Choose a variety of beads according to the design you have in mind. Make sure the holes are large enough for the cord.
- Scissors or Cutters: For cutting the stretch cord to the desired length.
- Tape: Handy for securing one end of the cord while you’re beading.
- Super New Glue: Essential for fastening the knot securely at the end of the process.
Remember, while creativity is key, using the right supplies will help you to achieve optimal results. Things like bead design, color coordination, and the feel of the stretch cord contribute to the uniqueness and wearability of your bracelet.
Gather your materials in a clean workspace, ideally a flat surface with good lighting, so you can see what you’re doing and keep your beads from rolling away. Now, with all your supplies in place, you’re ready for the next step: Preparing the Stretch Cord.
 Preparing the Stretch Cord – how to tie off elastic bracelet
With your bracelet making supplies in place, it’s time to prepare the stretch cord. Begin by cutting the Stretch Magic cord. Make sure it’s a few inches longer than your wrist size. Wrap the cord around your wrist and add extra length for comfort and knotting. Choose Stretch Magic for its reliability; it’s a trusted brand for elasticity and durability. Tape one end of the cord to a flat surface or use a clip. This will keep your beads from slipping off as you work. With the cord cut to the right length and one end secured, you’re now set to start creating your unique bracelet design in the next step.
Designing Your Bracelet: Bead Selection and Stringing
The design phase is where your creativity shines. First, select your beads. Diversity in size, shape, color, and texture adds interest to your bracelet. Ensure the holes are wide enough for the Stretch Magic cord. This will make stringing simpler and prevent damage to the cord. Once you’ve decided on your beads, lay them out in your desired pattern. This helps you visualize the final look before stringing.
Next, string the beads onto the Stretch Magic. Begin at the taped end, adding beads one by one. Follow your layout to keep the design consistent. If you change your mind, now is the time to adjust. Keep stringing until you have enough beads to encircle your wrist comfortably. Remember to leave extra cord for knotting; you’ll need this length later.
Stringing can be a meditative process that allows for personal expression. Take your time, enjoy the process, and see your vision come to life bead by bead. By the end of this stage, you’ll have a bracelet that’s ready to be securely knotted, ensuring that your hard work won’t unravel when you wear your new creation.
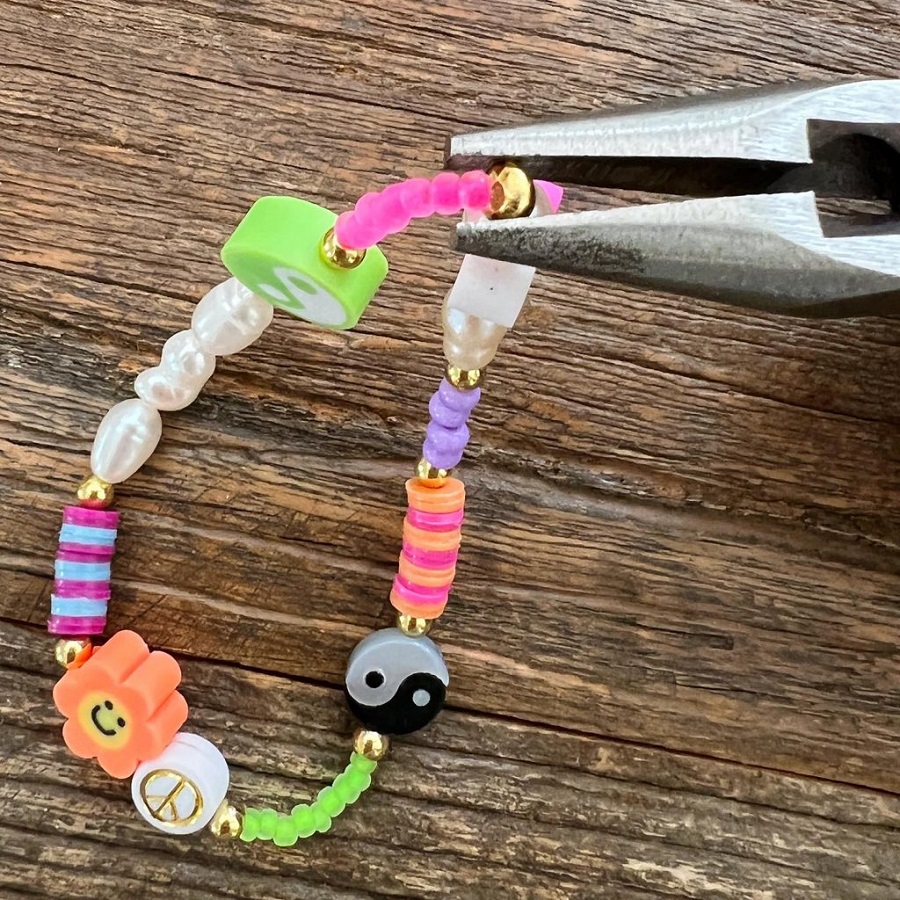
Knotting the Bracelet for Security – how to tie off elastic bracelet
Knotting is crucial in bracelet making for durability and wearability. Here’s how to secure your newly strung elastic bracelet with a strong knot. First, stretch the cord before knotting. This step ensures the cord is pre-stretched so your bracelet maintains shape over time. Hold each end between your fingers, and gently pull away from each other a few times. Now, bring the ends together and tie a simple overhand knot. Pull it tight, but be gentle to not snap the cord.
Then, tie a second overhand knot on top of the first one. This is known as a double knot and it adds extra security. For the best results, aim for the knots to sit close to the beads. This creates a seamless look and keeps the knot from being too visible. Once tied, give the bracelet a gentle tug to ensure the knots are snug and the beads are in place.
The Secret to a Strong Bracelet: Gluing the Knot
To make the knot even more secure, use a drop of super glue. This is a little secret that can make a big difference. Apply a small amount of Super New Glue to the knot you’ve made. Press down gently and hold for a few seconds to set it. Let the glue dry completely before moving on. This will lock the knot in place and prevent it from loosening with wear. When the glue is dry, stretch the bracelet slightly again. This makes sure that the cord and the glue bind well together.
Finishing Touches: Trimming and Hiding the Knot
After the glue is dry, trim the excess cord as close to the knot as possible. Use your scissors or cutters for a clean cut. Be careful not to snip the bracelet. If your design allows, slide the knot inside a nearby bead with a larger hole. This will hide the knot and give your bracelet a professional finish.
By following these steps, you will have a securely knotted, elastic bracelet that’s ready for wear or gift-giving. The security brought by a proper knot and a dab of glue will make all the difference in the longevity and appearance of your bracelet.
The Secret to a Strong Bracelet: Gluing the Knot
The gluing step is crucial for a lasting bracelet. After you’ve tied a strong knot, it’s time to glue it. Here’s a simple guide on how to do it:
- Use high-quality glue: Super New Glue is a great choice. It’s made to hold tight and dry clear.
- Apply a tiny drop: Just a small amount is enough. Too much glue can make the knot stiff and unsightly.
- Be precise: Aim for the knot itself. Use something small like a toothpick to control the drop.
- Press and hold: Put a little pressure on the knot with your finger for a few seconds. This helps the glue set.
- Dry thoroughly: Wait for the glue to dry completely. This might take a few minutes. Be patient for the best results.
With these steps, your elastic bracelet’s knot is safe from coming undone. This little trick using Super New Glue is how you create a bracelet that lasts.
Finishing Touches: Trimming and Hiding the Knot – how to tie off elastic bracelet
After gluing, it’s time to trim the extra cord. Use scissors or cutters for a neat finish. Cut close to the knot, but be cautious not to snip through your bracelet. If done right, this will keep everything tidy and reduce the chance of your knot catching on something.
For a more polished look, hide the knot if possible. Find a bead with a larger hole and slide the knot inside. This hides the knot and raises the quality of your bracelet. It helps your piece look more professional and clean.
By trimming excess string and tucking away the knot, your bracelet gains a finished, elegant appearance. These touches add to its charm and reduce wear and tear. With these last steps, your elastic bracelet is complete. It is strong, beautiful, and ready to wear or share with pride.
Additional Tips for Durable Stretch Bracelets
Creating stretch bracelets that last requires more than just strong knots and good glue. Include these additional tips to ensure durability and stretchiness:
- Choose the right cord thickness. Thicker cords can handle heavier beads. For lighter beads, thinner cords can be enough.
- Avoid overstretching. Pulling the cord too hard while stringing beads can weaken it.
- Even distribution of beads. Make sure beads spread evenly to avoid stress on any part of the cord.
- Regular wear testing. Gently stretch your bracelet now and then to check elasticity.
- Storage care. Keep bracelets flat and away from heat to prevent cord damage.
Follow these simple tips to make your stretch bracelets as durable as they are beautiful.
Stretchy Bracelet Making Kits: An Easy Start – how to tie off elastic bracelet
Getting into bracelet-making doesn’t have to be daunting. Stretchy bracelet making kits offer an easy start. These kits bring together all essential supplies. Beginners can find these particularly useful.
Stretchy bracelet kits include:
- Pre-cut Stretch Magic cord: measured for convenience.
- Assorted beads: chosen for fit and style.
- Super New Glue: to secure knots firmly.
- Instructions: simple, clear guides for assembly.
- Extras: like tape or clips to help with beading.
The kits make the process foolproof. You have all you need in one package. With pre-cut cords, there’s no need to measure or guess the length. The beads are curated to ensure they thread easily on the cord. Using Super New Glue keeps your bracelet intact for longer. Clear instructions take you through each step.
For those new to jewelry-making, kits save time on gathering materials. For experienced crafters, they offer a quick and easy project option. Some kits even include access to video tutorials if you prefer visual guidance.
Consider starting with a stretchy bracelet making kit for a hassle-free introduction into this rewarding craft. You can make multiple bracelets for yourself or as gifts. The kits also make for a great bonding activity with friends or family. Plus, the cost-effectiveness is hard to beat. You can create many bracelets for a modest price.
Remember to check the quality of the kit components. Look for kits that have good reviews and are recommended by other crafters. Embrace the convenience these kits offer and enjoy crafting a collection of stylish, stretchy bracelets with ease.