Introduction
Creating a paracord bracelet is not only a fun and rewarding craft but also a practical accessory that can serve you in various situations. Whether you’re looking to add a personalized touch to your survival gear or want to create a thoughtful gift, this step-by-step guide will walk you through the process of making a paracord bracelet from start to finish.
What You’ll Need
Before you get started, gather all the necessary materials and tools:
Materials
- Paracord: You can choose from a variety of colors—typically 550 paracord is recommended for its strength.
- Buckles: Plastic or metal buckles work well, but ensure they’re compatible with your desired bracelet width.
- Scissors: For cutting the paracord to the desired length.
- Lighter: To melt the ends of the paracord to prevent fraying.
- Measuring Tape: To ensure proper sizing of the bracelet.
- Clip Board (optional): This makes it easier to keep your work steady while crafting.
Optional Materials
- Beads or charms: Add some personalization to your bracelet.
- Tape: To secure the starting point of your bracelet while you work.
Measure Your Wrist
To create a comfortable and fitting bracelet, measure around your wrist with a measuring tape. Add an extra inch (2.5 cm) to the total length to account for the braid that will take place. For example, if your wrist measures 7 inches, you should cut a piece of paracord that is approximately 8 inches long.
Cut the Paracord
Once you have your measurement, cut two lengths of paracord: one for the main body and one for the color or style you wish to incorporate. Depending on the type of bracelet you want to make, the lengths might vary. A common rule of thumb is to use about 10-12 feet of paracord for a standard bracelet, allowing for multiple loops and braids.
Prepare the Paracord
Before you begin knotting, it’s important to prepare the ends of the paracord:
- Seal the Ends: Use a lighter to quickly pass over each cut end of the paracord until it melts slightly, then press it flat to create a heat-sealed tip. This will prevent fraying and make it easier to work with.
- Optional – Incorporate Colors: If you’re using more than one color of paracord, now is the time to prepare those as well.
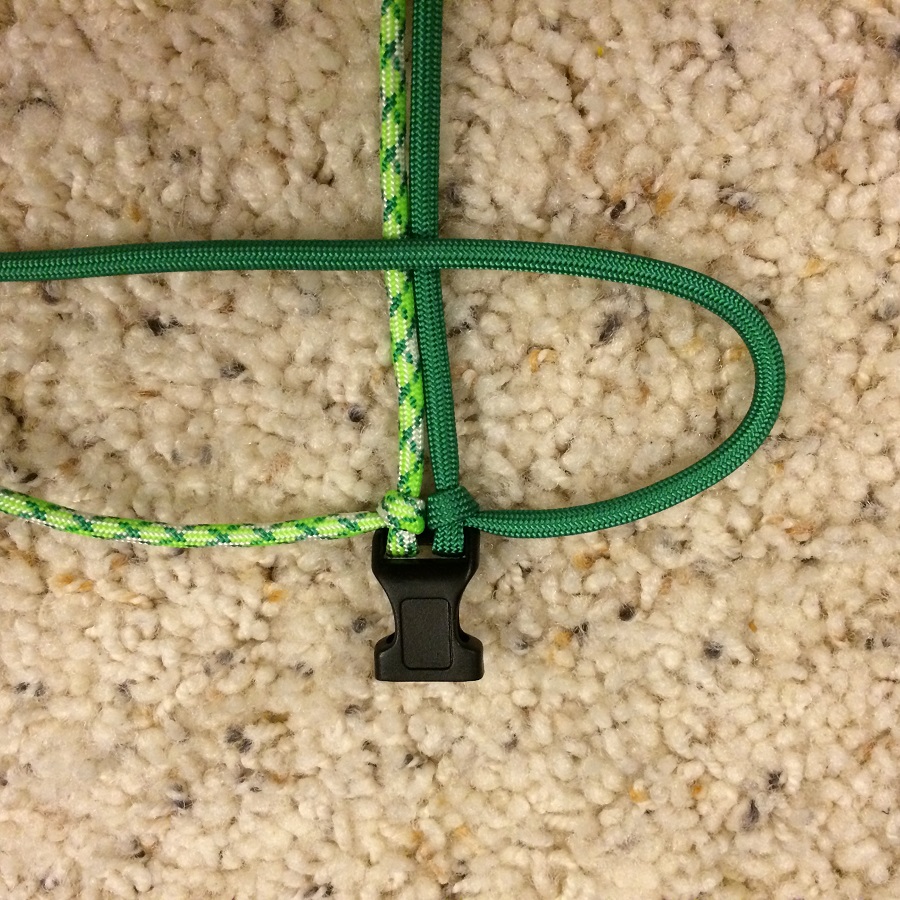
Attach the Buckles
Take your buckle and attach one side to the fixed end of your paracord:
- Pass the Anchor Cord Through: Thread the paracord through the buckle. This cord should be fixed in place; it won’t be woven or adjusted.
- Secure the Other Side: Attach the other end of the buckle to your second piece of cord so that it is also securely in place.
After securing both sides, hold the buckles together—this is the foundation of your bracelet.
Begin Braiding
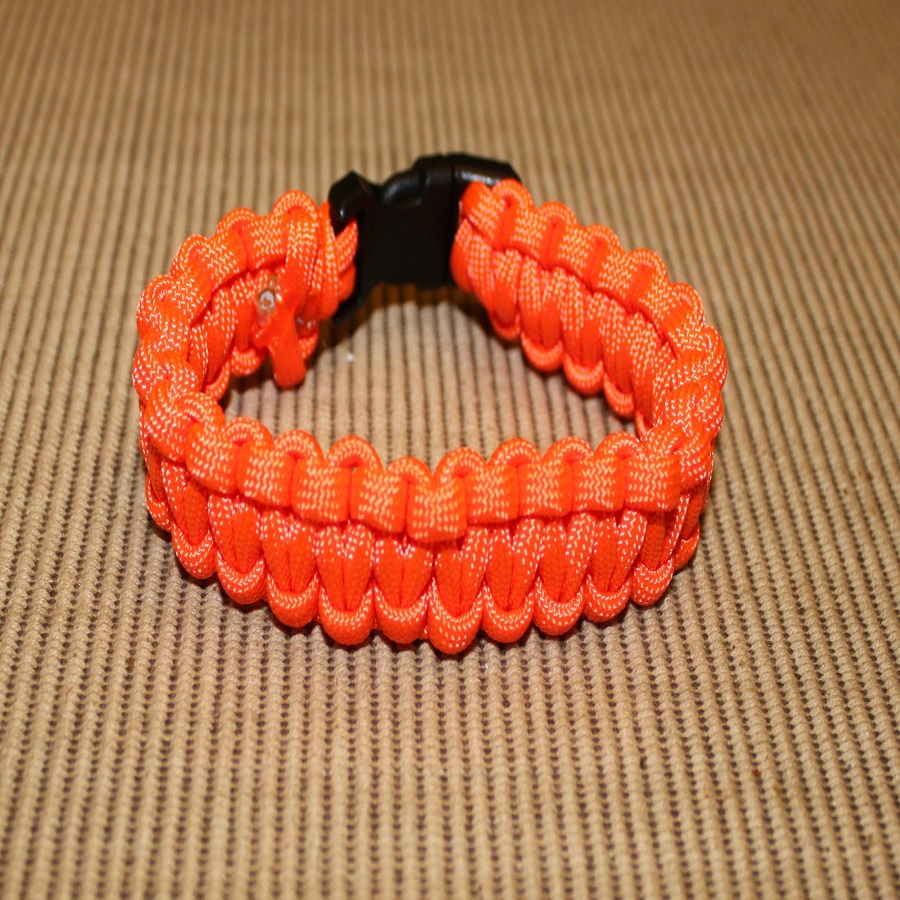
There are several braiding styles you can opt for. One of the most popular is the King Cobra weave, which is both strong and visually appealing.
King Cobra Weave Instructions:
- Position the Cord: Lay your working cord (the one that will be woven) around the foundation.
- Make the First Knot: Take the right working cord and place it behind the anchor cords (the two fixed cords), and then bring it under the left cord and up through the loop. Pull tight but don’t pull all the way—the knot should be adjustable.
- Continue Weaving: Repeat the process, alternating between the left and right working cords to create the braid.
Consistency is key; aim for uniform knots throughout for a polished finish.
Check Your Work
As you progress, regularly check the length of the bracelet to ensure that it matches your wrist measurement. It’s easier to adjust if needed while you still have some room.
Finishing Up
Once you reach your desired length (usually measured against your wrist), complete the final knot for added security.
- Secure the End: Use scissors to cut off any excess paracord, leaving about an inch remaining from where you’ve tied off.
- Melt the Ends: Use the lighter again to seal the ends before tucking them under the knots for a clean finish.
Attach the Final Buckle
Finally, attach the loose end of the buckle securely. Test the clasp several times to ensure it’s functioning and firm.
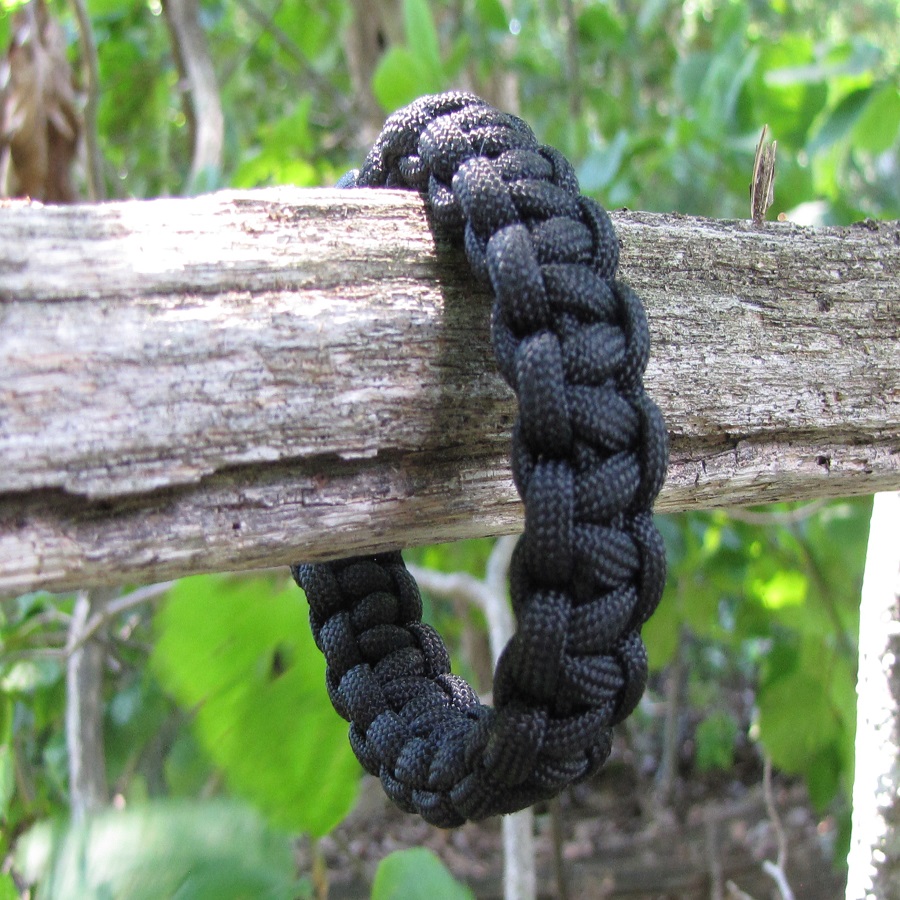
Enjoy Your Creation!
Congratulations! You’ve just made your very own paracord bracelet. You can wear it proudly or give it away as a fantastic gift. The beauty of crafting your own jewelry is that it blends function with style.
Bonus Tips
- Experiment: Feel free to play around with different knot styles or incorporate additional colors for a unique look.
- Practice: Your first attempt might be a little rough around the edges. Don’t get discouraged! With more practice, your technique will improve.
- Join a Community: Consider joining online forums or local crafting groups to share your experiences and find inspiration.
With this step-by-step guide, you should now feel confident tackling the art of paracord bracelet-making. Happy crafting!
How to Make a Paracord Bracelet
Cut the Paracord
Based on your wrist measurement, cut your paracord to the desired length. Typically, you will require about 10 feet for a 7-inch bracelet. Once cut, seal the ends with the lighter to prevent fraying.
Attach the Buckles
- Feed one end of the paracord through one side of the buckle.
- Create a loop by bringing it back and feeding it through the other side of the buckle, leaving a tail to create the adjustable part of the bracelet.
- Tighten to ensure a secure connection. Repeat this process on the other side with the remaining piece of paracord.
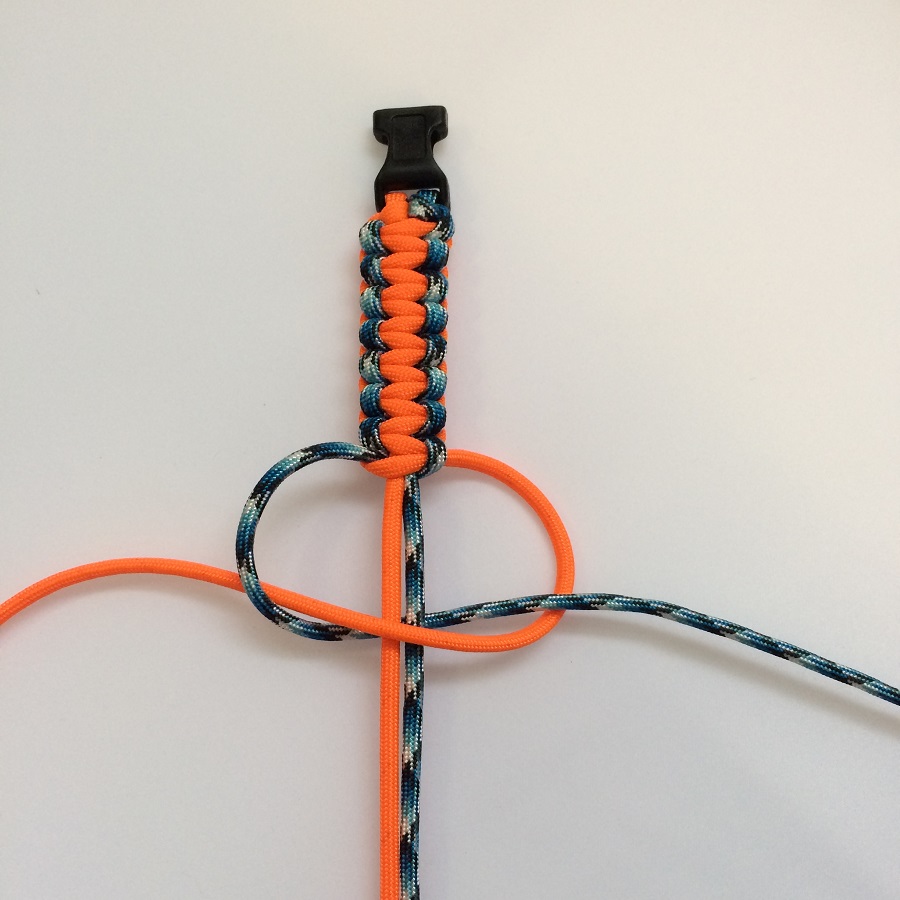
Start Knotting – The Cobra Weave Technique
The cobra weave is a common and easy knotting technique for paracord bracelets:
- Create the Base: Hold the buckle upside down and lay the two standing cords (the two lengths of paracord attached to the buckle) side by side.
- Weave the Paracord: Take the right side of the paracord and create a loop over the center cords, then tuck the left paracord behind the center cords and bring it through the loop created.
- Tighten: Pull it tight to secure the first knot.
- Repeat: Now switch sides. Take the left paracord, create a loop over the center cords, tuck the right paracord behind and through, and pull tight again.
- Continue: Repeat this process until you achieve your desired length. Make sure to keep an even tension throughout the weaving process for a professional finish.
Finishing Up
- Attach the Second Buckle: Once you have reached the desired length, attach the second side of the buckle the same way you did the first.
- Trim and Seal: Trim off any excess paracord and seal the edges so they won’t fray.
- Test the Fit: Before finalizing the knotting, try the bracelet on to ensure it fits comfortably. Adjust as needed.
Optional: Personalization
Feel free to get creative! You can add charms, beads, or even different colors of paracord to make the bracelet uniquely yours. Consider using a “braid” or “King Cobra” weave for advanced patterns if you’re feeling adventurous.
Aftercare and Maintenance
Paracord bracelets are durable, but they can still benefit from the occasional clean. Hand wash with mild soap and water, and let it air dry away from direct sunlight to prevent fading. Store your bracelet in a cool, dry place to keep it in good condition.
Conclusion
Making a DIY paracord bracelet is not just a simple craft project; it’s a gateway into the world of practical and creative crafting. By following these steps, you can create a stylish and functional accessory that showcases your personal style and creativity. With just a bit of practice, you’ll be eager to try more complex patterns and techniques. Plus, once mastered, this skill can lead to making great gifts for friends and family. Enjoy the process, and happy crafting!